6.2.5a Convex and concave lenses; ray diagrams (physics only)
A lens forms an image by refracting light
Lens
A lens is a transparent object that forms an image by refracting light at its curved surfaces.
- When light enters and leaves a lens it is refracted, and the curved surfaces bend different rays by different amounts, so the rays can meet or appear to come from one point, forming an image.
- The principal axis is the straight line through the centre of the lens; ray diagrams are drawn with it horizontal and the lens vertical.
Convex lenses converge light to a principal focus
Convex lens
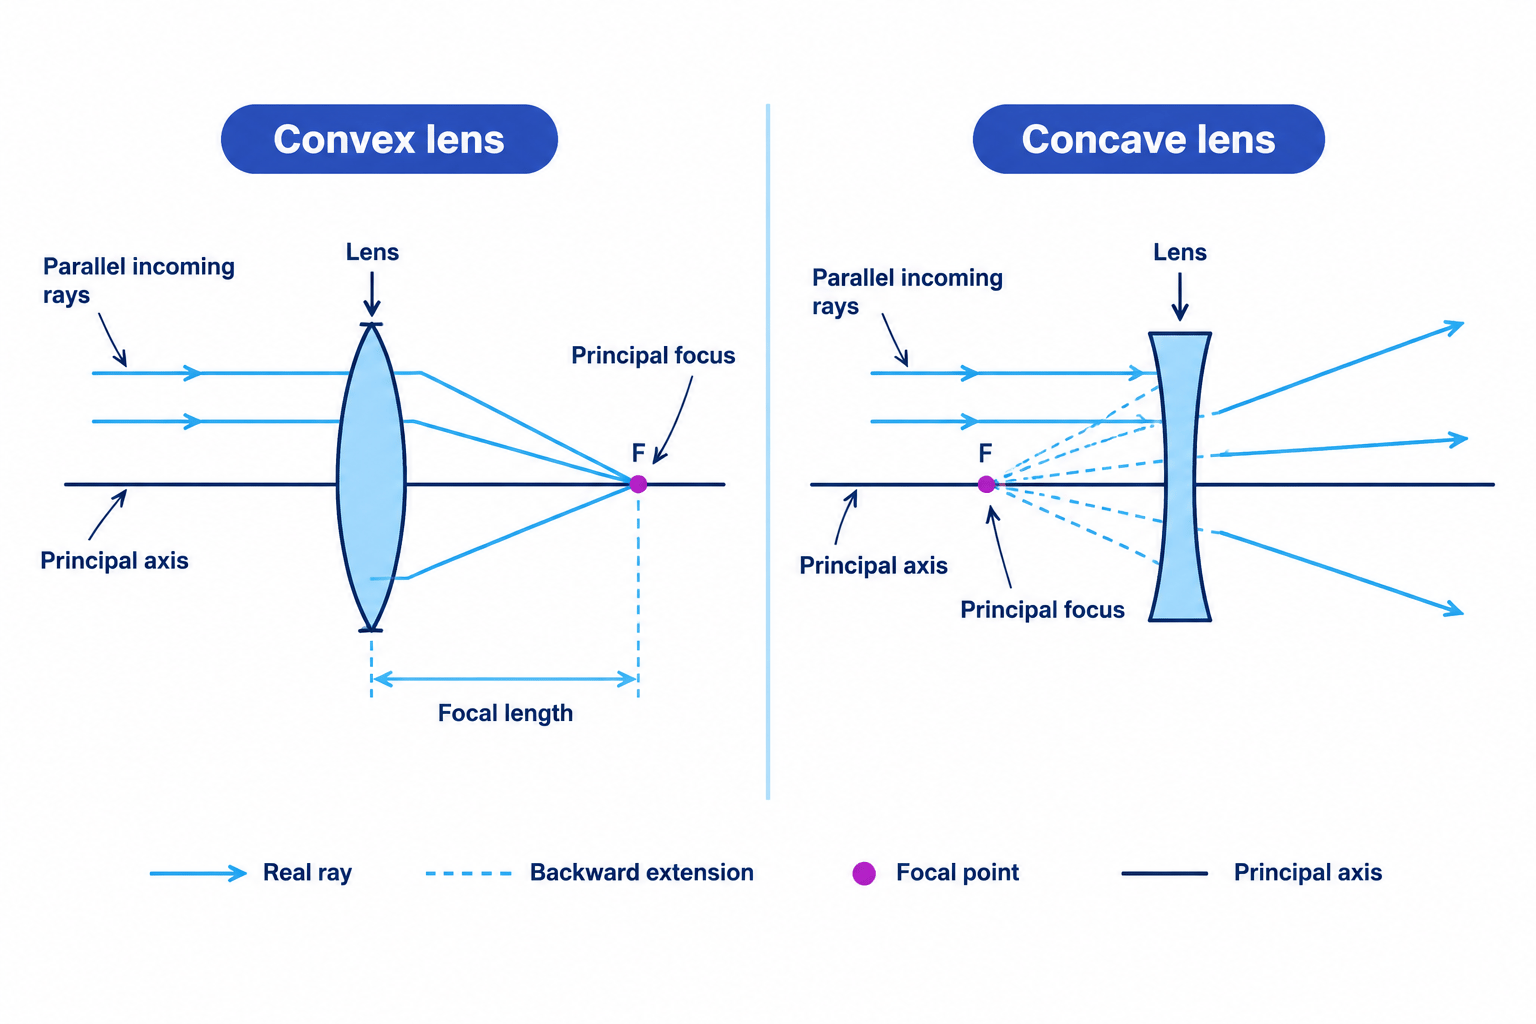
A convex (converging) lens makes parallel rays of light converge towards each other.
Principal focus
The principal focus is the point where rays travelling parallel to the principal axis are brought together by a convex lens.
Focal length
The focal length is the distance from the centre of the lens to its principal focus.
- A convex lens is thicker in the middle than at its edges, and is drawn as a vertical line with arrowheads pointing outwards.
- A convex lens can form a real image or a virtual image, depending on where the object is.
- A real image forms where the refracted rays actually meet, and it can be caught on a screen.
- A virtual image forms where the rays only appear to come from one point, and it cannot be caught on a screen.
- If the object is beyond the principal focus, the rays meet and a real image forms; if the object is inside the focal length, the rays spread out and their backward extensions give a virtual image.
Constructing a convex-lens ray diagram
- Start both rays from the same point on the object, usually its top.
- Draw one ray parallel to the principal axis, then, after the lens, through the principal focus on the far side.
- Draw a second ray straight through the centre of the lens without bending.
- Where the two refracted rays cross marks the real image; if they diverge, extend them back with dashed lines to locate a virtual image.
Concave lenses always form a virtual image
Concave lens
A concave (diverging) lens makes parallel rays of light diverge, or spread apart.
- A concave lens is thinner in the middle than at its edges, and is drawn as a vertical line with arrowheads pointing inwards.
- A ray entering parallel to the axis leaves spreading away from it, appearing to come from the principal focus on the same side as the object.
- To locate the image, draw the parallel ray diverging after the lens, extend it back through the focus with a dashed line, draw a second ray through the centre, and extend both back until they meet.
- The rays leaving a concave lens never actually meet, so its image is always virtual.
- Do not assume a convex lens always gives a real image: it can give a real or a virtual image; a concave lens always gives a virtual image.
- A virtual image is not where real rays meet: find it by extending the diverging rays backwards.
- Use a ruler and add arrowheads to show the direction of the light.
- Use solid lines for real ray paths and dashed lines for backward extensions to a virtual image.
- Give the lens symbol outward arrowheads for convex and inward arrowheads for concave.
- How does a lens form an image?
- Where do parallel rays meet after a convex lens?
- What is meant by focal length?
- Which lens can form either a real or a virtual image?
- How do you locate a virtual image on a ray diagram?
6.2.5b Magnification (physics only)
Magnification compares image height with object height
Magnification
Magnification is the ratio of the image height to the object height, calculated from magnification=image heightobject height\text{magnification} = \frac{\text{image height}}{\text{object height}}magnification=object heightimage height.
- A lens can make an image that is a different height from the object, and magnification says how many times taller the image is.
- Use the equation magnification=image heightobject height\text{magnification} = \frac{\text{image height}}{\text{object height}}magnification=object heightimage height, with the image height on top and the object height underneath.
- Magnification has no units because it is a ratio: the unit of length in the top cancels the same unit in the bottom.
- Measure the image height and object height in the same unit (both in mm\text{mm}mm or both in cm\text{cm}cm); if they are given in different units, convert one first.
- A magnification of 333 means the image is three times as tall as the object.
- Question: An object is 12 mm12\ \text{mm}12 mm tall and a lens forms an image 36 mm36\ \text{mm}36 mm tall. Find the magnification.
- Write the equation: magnification=image heightobject height\text{magnification} = \frac{\text{image height}}{\text{object height}}magnification=object heightimage height.
- Both heights are already in mm\text{mm}mm, so no conversion is needed.
- Substitute: magnification=3612\text{magnification} = \frac{36}{12}magnification=1236.
- Calculate: magnification=3\text{magnification} = 3magnification=3, with no units, so the image is three times as tall as the object.
- Do not turn the fraction over: image height goes on top and object height underneath.
- Do not give magnification a unit such as mm\text{mm}mm: it is a ratio, so it has none.
- Do not substitute heights in different units: convert them to the same unit first.
- Write the equation, check the units match, then substitute image height over object height.
- Give the final answer as a plain number with no unit.
- What is the equation for magnification?
- Which height is on the top of the fraction?
- Why does magnification have no units?
- What must be true of the units used for image height and object height?
- What does a magnification of 444 tell you about the image?