Parts of a light microscope
Definition
Light microscope
An instrument that uses visible light and glass lenses to produce a magnified image of a specimen.
Definition
Specimen
The piece of biological material that is mounted on a slide and examined under a microscope.
- A light microscope shines visible light up through a thin specimen and uses curved glass lenses to bend that light outwards, so the image reaching your eye is far larger than the object on the slide.
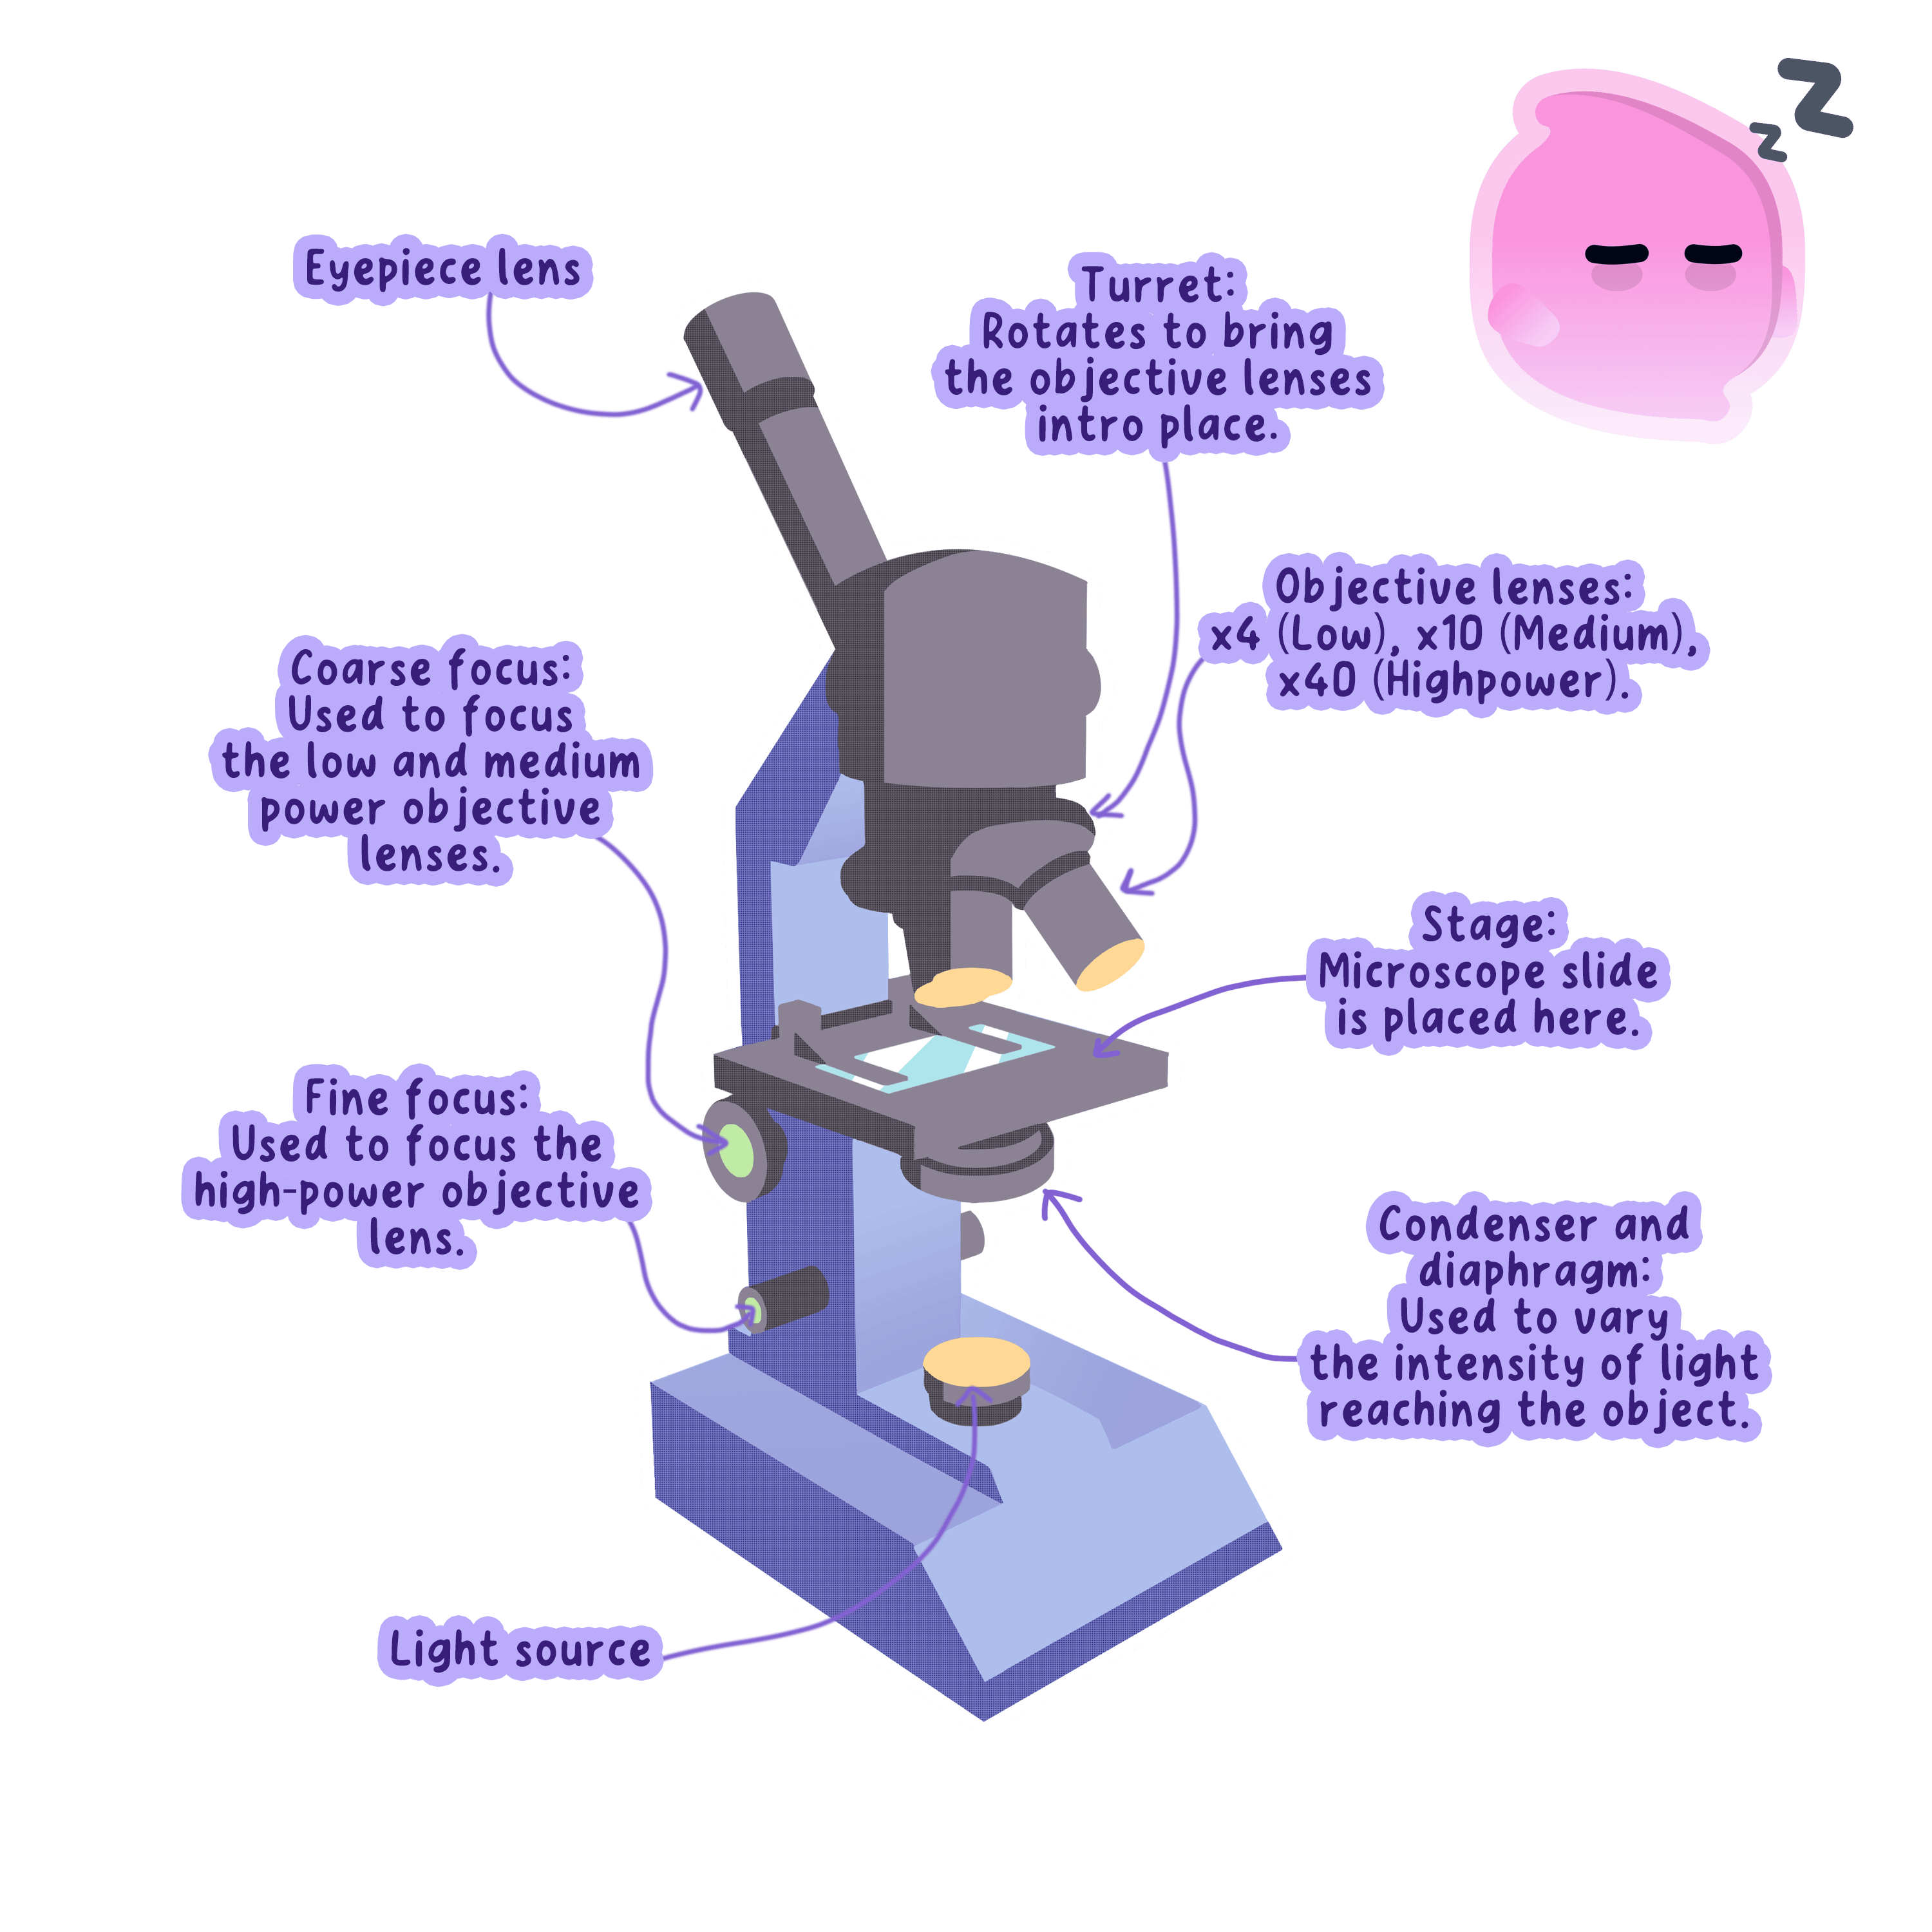
- The lamp sits in the base beneath the stage and supplies the beam of light that travels upwards through the specimen.
- The condenser is a lens under the stage that gathers light from the lamp and concentrates it onto the small area where the specimen lies.
- The iris diaphragm is an adjustable ring in the condenser that changes how much of that light passes through, which sets the contrast of the image.
- The stage is the flat platform the slide rests on, and it has a hole in the middle so light can pass straight through the specimen.
- Stage clips hold the slide firmly in place so the specimen does not slip out of view while you move it.
- The objective lenses are mounted on a rotating turret directly above the specimen, and a school microscope normally carries three, marked ×4\times4×4, ×10\times10×10 and ×40\times40×40.
- The eyepiece lens sits at the top of the tube and is the lens you look down, and it is usually ×10\times10×10.
- The coarse focus knob moves the stage or the tube through a large distance and brings the specimen roughly into view at low power.
- The fine focus knob moves it through a very small distance and sharpens the image once the specimen is almost in focus.
- Light therefore travels from the lamp, through the condenser, through the specimen, into the objective lens and then into the eyepiece lens, and each of the two lenses enlarges the image in turn.
Note
- Always begin with the lowest-power objective lens in place, because the field of view is widest at low power and a small specimen is far easier to find.
- Lower the objective lens towards the slide while watching from the side, then focus by moving the lens away from the slide, so the lens can never be driven down into the glass.
Preparing and staining a slide
Definition
Stain
A coloured chemical that binds to particular structures in a specimen so that they can be seen under a microscope.
- Light has to pass through the specimen to reach your eye, so the specimen must be thin enough to be almost transparent, ideally a single layer of cells.
- The specimen is laid flat in the centre of a clean glass microscope slide, the rigid strip of glass that carries it under the lenses.
- A drop of water or stain is added on top, which stops the specimen drying out and shrivelling while you look at it.
- A cover slip is the thin square of glass placed over the specimen, and it flattens the specimen into an even layer and keeps the liquid away from the objective lens.
- The cover slip is held at roughly 45∘45^\circ45∘ on a mounted needle and lowered slowly, so the liquid spreads sideways and drives the air out ahead of it.
- Air trapped under the cover slip appears as a circle with a thick dark rim, and it is easy to mistake for a cell until you notice that nothing lies inside it.
- Most plant and animal cells are colourless and nearly transparent, so under plain light they show little more than faint grey outlines.
- A stain is a coloured chemical that binds strongly to some structures and weakly to others, so different parts of the cell take on different depths of colour and become visible.
- Iodine solution stains plant cytoplasm pale yellow and stains the nucleus a much darker orange-brown, which is why the nucleus of an onion cell stands out against the rest of the cell.
- Methylene blue stains the nucleus of an animal cell dark blue, which makes the nucleus easy to pick out in a cheek cell that is otherwise almost invisible.
- Crystal violet and eosin work in the same way and are chosen when a different structure or a different tissue needs to be picked out.
- Staining kills the cells, so a stained slide shows the structure of a cell but never shows it carrying out a living process.
Common Mistake
- Do not flood the slide with stain, because the surplus runs out beyond the cover slip and darkens the whole field of view until nothing can be told apart.
- Do not drop the cover slip flat onto the specimen, because the air trapped underneath hides every cell beneath a bubble.
- Do not describe a stained specimen as living material, because the stain has killed it.
Practical
Observing plant and animal cells
- Aim: to prepare stained slides of onion epidermis and human cheek cells, view them with a light microscope, and record them as labelled biological drawings with a stated magnification.
- Apparatus: light microscope, glass microscope slides, cover slips, forceps, mounted needle, scalpel, white tile, a fleshy onion scale, sterile cotton buds, a beaker of disinfectant, iodine solution and methylene blue in dropping bottles, distilled water in a dropping pipette, filter paper, sharp pencil, ruler and eye protection.
- Method, the onion slide:
- Cut a square of about 1 cm1\ \text{cm}1 cm from a fleshy onion scale on a white tile, cutting away from your fingers.
- Grip the thin skin on the inner curved surface with forceps and peel it away in one piece. This epidermis is a single cell thick, which is what makes it transparent enough to view.
- Lay the peel flat in the centre of a slide and tease out any folds with the mounted needle, because a fold stacks cells on top of one another and blurs the image.
- Add a single drop of iodine solution directly onto the peel.
- Hold a cover slip at about 45∘45^\circ45∘ on the mounted needle, rest one edge on the slide beside the drop, and lower it slowly so the liquid spreads and the air is driven out.
- Touch the corner of a piece of filter paper to the edge of the cover slip to draw off the surplus stain.
- Method, the cheek cell slide:
- Rub the inside of your own cheek gently with a clean cotton bud to collect a few loose surface cells.
- Smear the bud across the centre of a slide in one thin sweep, then put the used bud straight into the disinfectant.
- Add one drop of methylene blue, lower a cover slip in the same way, and blot off the surplus.
- Method, viewing and recording:
- Clip the slide to the stage with the specimen centred over the hole, and open the iris diaphragm.
- Rotate the ×4\times4×4 objective into place, watch from the side while the coarse focus brings the lens close to the slide, then look down the eyepiece and focus upwards until the cells appear.
- Sharpen the image with the fine focus, then close the iris diaphragm slightly until the cell outlines look crisp rather than washed out.
- Move up to ×10\times10×10 and then ×40\times40×40, using the fine focus only, so the high-power lens cannot be driven into the cover slip.
- Draw a small group of cells with a sharp pencil, using single unbroken lines with no shading, no sketching and no arrow heads.
- Label the structures with straight ruled lines that do not cross one another, and write the eyepiece and objective magnifications beside the drawing.
- Results: onion epidermis cells appear as regular brick shapes packed in tidy rows, each with a straight wall and a stained nucleus. Cheek cells appear as separate, rounded, irregular flakes with a stained nucleus and no wall, and they lie much further apart.
- Maths: total magnification is the eyepiece magnification multiplied by the objective magnification, so ×10\times10×10 with ×40\times40×40 gives ×400\times400×400. Measure a drawn cell with a ruler and use A=IMA=\dfrac{I}{M}A=MI to find its real width, converting with 1 mm=1000 μm1\ \text{mm}=1000\ \mu\text{m}1 mm=1000 μm.
- Watch out: too much stain darkens the field, trapped bubbles hide cells, a folded peel gives a double layer, and focusing downwards at high power cracks the cover slip. Draw only what is on the slide, not the textbook cell you expect to see.
- Safety: wear eye protection, cut on a tile away from your fingers, treat iodine and methylene blue as staining chemicals that mark skin and clothing, use only your own cotton bud and place it in disinfectant straight afterwards, and carry the microscope with one hand under the base.
Calculating magnification
Definition
Magnification
The number of times larger an image is than the real object it shows.
Definition
Scale bar
A labelled line printed on an image that shows the real length the line stands for.
- Magnification compares the size of the image with the size of the real object, and it has no unit because it is one length divided by another.
- The equation is magnification=size of imagesize of real object\text{magnification}=\dfrac{\text{size of image}}{\text{size of real object}}magnification=size of real objectsize of image.
- In symbols this is M=IAM=\dfrac{I}{A}M=AI, where III is the measured size of the image and AAA is the actual size of the object.
- Rearranging gives I=M×AI=M\times AI=M×A for the image size and A=IMA=\dfrac{I}{M}A=MI for the real size.
- The total magnification of a microscope is the eyepiece magnification multiplied by the objective magnification, so a ×10\times10×10 eyepiece used with a ×40\times40×40 objective gives 10×40=×40010\times40=\times40010×40=×400.
- Both lengths must be converted into the same unit before dividing, because a mismatch of units changes the answer by a factor of a thousand or more.
- The conversions needed are 1 mm=1000 μm1\ \text{mm}=1000\ \mu\text{m}1 mm=1000 μm and 1 μm=1000 nm1\ \mu\text{m}=1000\ \text{nm}1 μm=1000 nm.
- Cells are normally measured in micrometres, so a typical animal cell is roughly 20 μm20\ \mu\text{m}20 μm across and a bacterial cell roughly 2 μm2\ \mu\text{m}2 μm long.
- Very small measurements are written in standard form to keep them manageable, so 0.002 mm0.002\ \text{mm}0.002 mm is written as 2×10⁻³ mm2\times10^{-3}\ \text{mm}2×10⁻³ mm.
- A scale bar printed beside a photograph is a line of known real length, so measuring the bar with a ruler and dividing by the length it stands for gives the magnification of that photograph.
- Once the magnification of a photograph is known, the real size of anything else in the same photograph is found by measuring it and dividing by that magnification.
Example
Magnification from a photograph
- An onion cell measures 45 mm45\ \text{mm}45 mm across on a printed photograph, and the real cell is 300 μm300\ \mu\text{m}300 μm across.
- Convert the image size into the unit used for the object: 45 mm=45 000 μm45\ \text{mm}=45\,000\ \mu\text{m}45 mm=45000 μm.
- Substitute into M=IAM=\dfrac{I}{A}M=AI: M=45 000300M=\dfrac{45\,000}{300}M=30045000.
- The magnification is ×150\times150×150, written with no unit.
Example
Real size from a scale bar
- A photograph carries a scale bar labelled 50 μm50\ \mu\text{m}50 μm that measures 10 mm10\ \text{mm}10 mm when checked with a ruler.
- Convert the measured length: 10 mm=10 000 μm10\ \text{mm}=10\,000\ \mu\text{m}10 mm=10000 μm.
- The magnification of the photograph is M=10 00050=×200M=\dfrac{10\,000}{50}=\times200M=5010000=×200.
- A chloroplast in the same photograph measures 1.2 mm1.2\ \text{mm}1.2 mm, which is 1200 μm1200\ \mu\text{m}1200 μm.
- Its real length is A=IM=1200200=6 μmA=\dfrac{I}{M}=\dfrac{1200}{200}=6\ \mu\text{m}A=MI=2001200=6 μm.
Exam technique
Answering magnification questions
- Write the equation out before substituting, because the equation line carries its own mark even when the arithmetic goes wrong.
- Convert both lengths into micrometres first and write the converted value down, since a missing factor of 100010001000 is the most common way marks are lost here.
- Give a magnification as a bare number with a multiplication sign in front, such as ×150\times150×150, and never attach a unit to it.
- Measure a scale bar or an image to the nearest millimetre with a ruler rather than estimating it, because a measured value falls inside the allowed tolerance and a guess often does not.
Self review
- Name the two lenses that magnify the image in a light microscope and state which one you look down.
- Explain why a specimen must be thin and why a stain is added before it is viewed.
- State the equation that links magnification, image size and real size.
- Calculate the total magnification when a ×10\times10×10 eyepiece is used with a ×40\times40×40 objective lens.
- A cell measures 30 mm30\ \text{mm}30 mm on a photograph taken at a magnification of ×1500\times1500×1500. Calculate its real width in micrometres.