Rays, normals and angles
Ray diagram
A drawing that uses straight lines with arrowheads to show the path and direction of travel of light.
Normal
An imaginary line drawn at right angles to a surface at the point where a ray meets it.
Angle of incidence
The angle between an incoming ray and the normal at the point where the ray meets a surface.
- A ray is a straight line with an arrowhead that shows the path and direction of travel of a narrow beam of light.
- A ray diagram is drawn in two dimensions on flat paper, with a ruler and a sharp pencil, because it is an accurate drawing of where the light goes.
- The ray travelling towards a surface is the incident ray, and the point where it meets the surface is the point of incidence.
- The normal is drawn through the point of incidence at exactly 90∘90^\circ90∘ to the surface, usually as a dashed line so that it cannot be mistaken for a ray.
- Every angle in a ray diagram is measured between a ray and the normal, never between a ray and the surface.
- The angle of incidence, iii, is the angle between the incident ray and the normal.
- To measure an angle, place the centre of a protractor on the point of incidence and line up its zero mark with the normal.
- A ray that travels along the normal has an angle of incidence of 0∘0^\circ0∘.
- If a question gives the angle between a ray and the surface, subtract it from 90∘90^\circ90∘ to find the angle between the ray and the normal.
Reflection from a plane mirror
Reflection
The change in direction of a wave at an interface so that it travels back into the material it came from.
Angle of reflection
The angle between a reflected ray and the normal at the point where the ray leaves a surface.
Law of reflection
The rule that the angle of reflection is always equal to the angle of incidence, both measured from the normal.
- A plane mirror is a flat, highly polished surface that reflects almost all of the light that falls on it.
- The ray leaving the mirror is the reflected ray, and the angle of reflection, rrr, is the angle between the reflected ray and the normal.
- The law of reflection states that the angle of reflection is equal to the angle of incidence, so i=ri = ri=r.
- The incident ray, the reflected ray and the normal all lie in the same flat plane, which is why reflection can be drawn on a sheet of paper.
- A ray that strikes a mirror along the normal is reflected straight back along its own path.
- To construct a reflection ray diagram, carry out these steps in order.
- Draw the mirror as a straight line and shade a few short lines behind it to show its non-reflecting back.
- Draw the incident ray with a ruler up to the mirror and add an arrowhead pointing towards the mirror.
- Draw a dashed normal at 90∘90^\circ90∘ to the mirror through the point of incidence.
- Measure the angle of incidence from the normal with a protractor.
- Draw the reflected ray on the other side of the normal at the same angle, and add an arrowhead pointing away from the mirror.
- The image in a plane mirror is virtual, upright, the same size as the object and the same distance behind the mirror as the object is in front of it.
- To locate the image, draw two rays from the same point on the object, reflect each one using the law of reflection, and extend both reflected rays backwards behind the mirror as dashed lines.
- The point where the dashed lines cross is the image of that point, and your brain sees the light as if it came from there.
- The image is also laterally inverted, so its left and right sides appear swapped, which is why the word AMBULANCE is printed in mirror writing on the front of an ambulance.
Reflecting a ray at a shallow angle
- A ray strikes a plane mirror so that it makes an angle of 55∘55^\circ55∘ with the mirror surface.
- Angles are measured from the normal, which is at 90∘90^\circ90∘ to the mirror, so find the angle of incidence first.
- The law of reflection gives the angle of reflection directly.
- The angle between the incident ray and the reflected ray is the sum of the two angles.
- Draw the reflected ray at 35∘35^\circ35∘ to the normal on the opposite side from the incident ray, with its arrowhead pointing away from the mirror.
Refraction through a rectangular glass block
Refraction
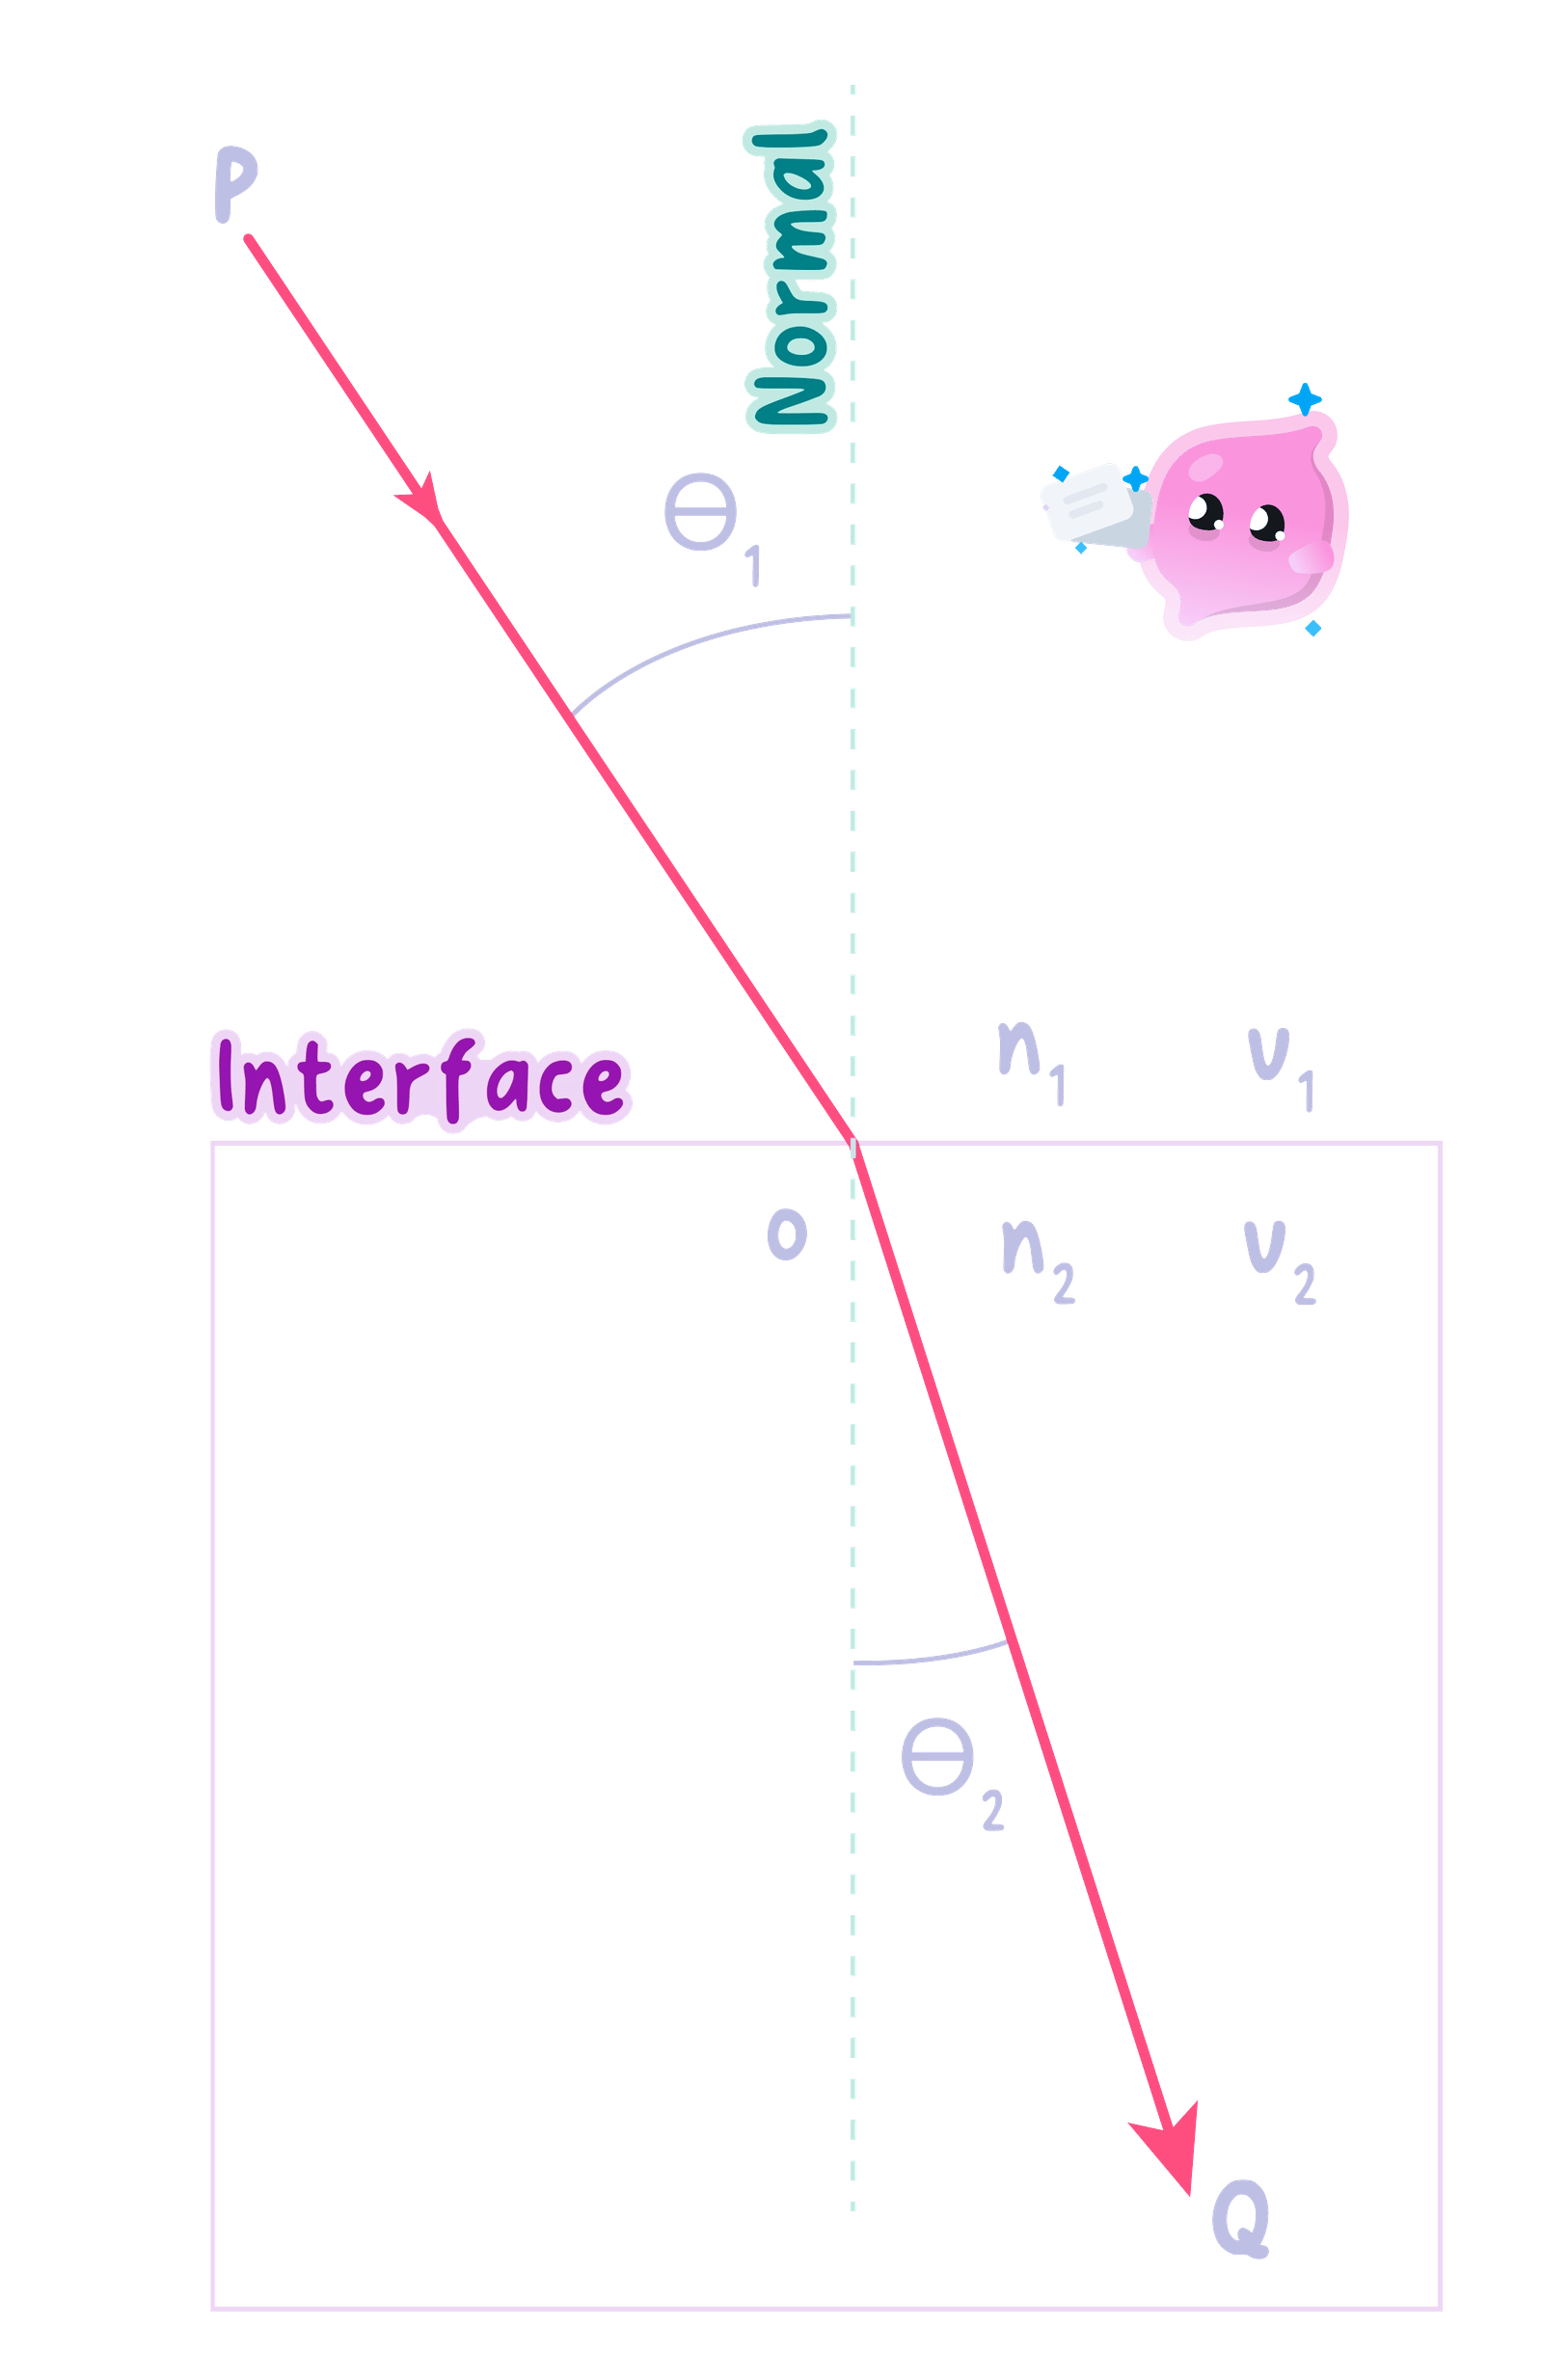
The change in direction of a wave as it crosses an interface at an angle, caused by a change in its speed.
Angle of refraction
The angle between a refracted ray and the normal at the point where the ray crosses an interface.
- The ray that travels on into the second material after crossing an interface is the refracted ray.
- The angle of refraction is the angle between the refracted ray and the normal.
- A ray entering glass from air slows down and bends towards the normal, so its angle of refraction is smaller than its angle of incidence.
- A ray leaving glass for air speeds up and bends away from the normal, so its angle of refraction is larger than its angle of incidence.
- A ray that meets an interface along the normal passes straight through without changing direction.
- When a ray passes through a rectangular block with parallel sides, the bend at the second face reverses the bend at the first face.
- The ray that comes out of the block is therefore parallel to the ray that went in, but it is shifted sideways.
- To construct a refraction ray diagram for a glass block, carry out these steps in order.
- Draw the outline of the block and mark the point where the incident ray meets the first face.
- Draw a dashed normal through this point, extending it a short way into the glass.
- Draw the refracted ray inside the block at a smaller angle to the normal than the incident ray, and continue it to the second face.
- Draw a second dashed normal where the ray reaches the second face.
- Draw the emerging ray bending away from this normal so that it leaves parallel to the original incident ray.
- Add an arrowhead to each section of the ray to show the direction of travel.
- Some light is also reflected at each face of the block, so a faint reflected ray can usually be seen as well as the refracted one.
Refraction through a triangular prism
- A triangular prism has faces that are not parallel, so the bend at the second face does not cancel the bend at the first face.
- Light entering the first face bends towards the normal, and light leaving the second face bends away from the normal.
- The two faces slope towards each other, so both changes of direction turn the ray the same way, towards the thicker base of the prism.
- The emerging ray therefore leaves the prism travelling in a very different direction from the incident ray.
- To draw the path through a prism, construct a separate normal at each face and apply the towards or away rule at each interface in turn.
Investigating reflection and refraction with a ray box
- Aim: to show that the angle of reflection from a plane mirror equals the angle of incidence, and to trace the paths of rays refracted through a rectangular glass block and a triangular prism.
- Apparatus: ray box with a single-slit plate, 12 V12\ \text{V}12 V power supply, plane mirror in a holder, rectangular glass block, triangular glass prism, sheets of plain A3 paper, protractor, ruler, sharp pencil and a dimly lit room.
- Method, reflection:
- Draw a straight line across the middle of a sheet of paper and stand the reflecting surface of the mirror exactly along it.
- Draw a normal at 90∘90^\circ90∘ to the line near its centre with a protractor and ruler.
- Use the protractor to draw incident rays at 20∘20^\circ20∘, 30∘30^\circ30∘, 40∘40^\circ40∘, 50∘50^\circ50∘ and 60∘60^\circ60∘ to the normal, all meeting the mirror line at the normal.
- Shine a thin ray from the ray box along the first line so that it strikes the mirror exactly where the normal meets it.
- Mark the reflected ray with two small crosses, one close to the mirror and one as far away as possible.
- Repeat for each angle of incidence, then remove the mirror and join each pair of crosses back to the point of incidence with a ruler.
- Measure each angle of reflection from the normal and record it in a table beside its angle of incidence.
- Method, glass block:
- Place the block in the middle of a fresh sheet and draw round it carefully with a sharp pencil.
- Shine a ray at one long face at an angle and mark the incident ray and the emerging ray with two crosses each.
- Remove the block, join the crosses, and connect the point where the ray entered to the point where it left to show its path inside the glass.
- Draw a normal at each face, then measure the angle of incidence and the angle of refraction at the first face.
- Repeat for several different angles of incidence, drawing round the block again on a new sheet each time.
- Method, prism:
- Draw round the prism and shine a ray at one face so that it passes through and leaves from a second face.
- Mark and join the rays in the same way, then draw a normal at each face that the ray crosses.
- Results:
- For the mirror, each angle of reflection is within one or two degrees of its angle of incidence.
- For the block, the angle of refraction inside the glass is always smaller than the angle of incidence, and the emerging ray is parallel to the incident ray.
- For the prism, the ray bends towards the base of the prism at both faces.
- Watch out:
- Ray box rays have a width, so mark the centre of each ray rather than one edge.
- Crosses placed close together give a large error in the direction of the line, so space them as far apart as the paper allows.
- A block or mirror that moves during the experiment shifts every ray, so hold it still and draw round it before you begin.
- Look straight down on the protractor when reading an angle to avoid a parallax error.
- Safety: the ray box lamp becomes hot, so do not touch it while it is switched on, and handle the glass block and prism carefully because a chipped edge can be sharp.
- Do not measure angles from the mirror or the surface of the block, because angles of incidence, reflection and refraction are all measured from the normal.
- Do not draw every refracted ray bending towards the normal, because a ray leaving glass for air bends away from it.
- Do not bend a ray that travels along the normal, because it passes straight through the interface.
- Do not draw the image in a plane mirror in front of the mirror, because it is always the same distance behind the mirror as the object is in front.
Drawing ray diagrams for marks
- Use a ruler for every ray, normal and surface, because freehand lines are often not credited.
- Draw the normal as a dashed line at 90∘90^\circ90∘ to the surface, exactly at the point where the ray meets it.
- Put an arrowhead on every section of every ray, including the parts inside a glass block.
- For reflection, measure the angle of incidence and draw the reflected ray at the same angle on the other side of the normal.
- For refraction, check the direction of bending at each face separately before you draw it.
- Define the normal and state how it is drawn on a ray diagram.
- State the law of reflection.
- Calculate the angle of reflection for a ray that makes an angle of 20∘20^\circ20∘ with the surface of a plane mirror.
- Describe the path of a ray that passes through a rectangular glass block at an angle.
- Describe four properties of the image formed by a plane mirror.
