Definition
Solenoid
A solenoid is a long coil of insulated wire that produces a magnetic field when there is a current in the wire.
Definition
Electromagnet
An electromagnet is a magnet made by passing a current through a coil of wire, which is magnetic only while the current flows.
- A solenoid is made by winding a single length of insulated wire into many closely packed loops, each loop being called a turn.
- The wire is insulated so that the current is forced to travel all the way round every turn instead of taking a short cut where the turns touch.
- The same current passes through every turn in the same direction, one after another, because the coil is a single unbroken wire in series with the supply.
- Each turn on its own is a short piece of current-carrying conductor, and so each one produces its own circular magnetic field.
- The field of the whole solenoid is the combination of all these separate fields, added together point by point through the space in and around the coil.
- The result looks like the field of a bar magnet. The field lines emerge from one end of the solenoid, loop round the outside and return at the other end, so a solenoid has a north end and a south end.
- The important difference from a bar magnet is that a solenoid can be switched off. Break the circuit and the field disappears instantly, which is what makes an electromagnet so useful.
- Reversing the current swaps the two ends over, so the end that was a north end becomes a south end. A permanent magnet cannot be reversed this way.
The field inside the solenoid
- Along the axis running through the middle of the coil, the field contributed by every single turn points the same way, straight down the centre of the solenoid.
- Because the contributions all point the same way, they add together. Two hundred turns each adding their share build a field far stronger than any one turn could produce alone.
- The field inside is also almost uniform, meaning it has nearly the same strength and the same direction everywhere in the central region of the coil.
- It works out this way because every turn is identical and evenly spaced, so wherever you stand inside the coil the arrangement of turns around you looks much the same.
- On a diagram the inside field is drawn as lines that are:
- straight and parallel to the axis of the coil
- evenly spaced across the width of the coil
- packed much more closely than the lines drawn outside, showing the much stronger field
- The word almost matters. Right at the two open ends the lines begin to fan out, so the field is only truly even well inside a long coil.
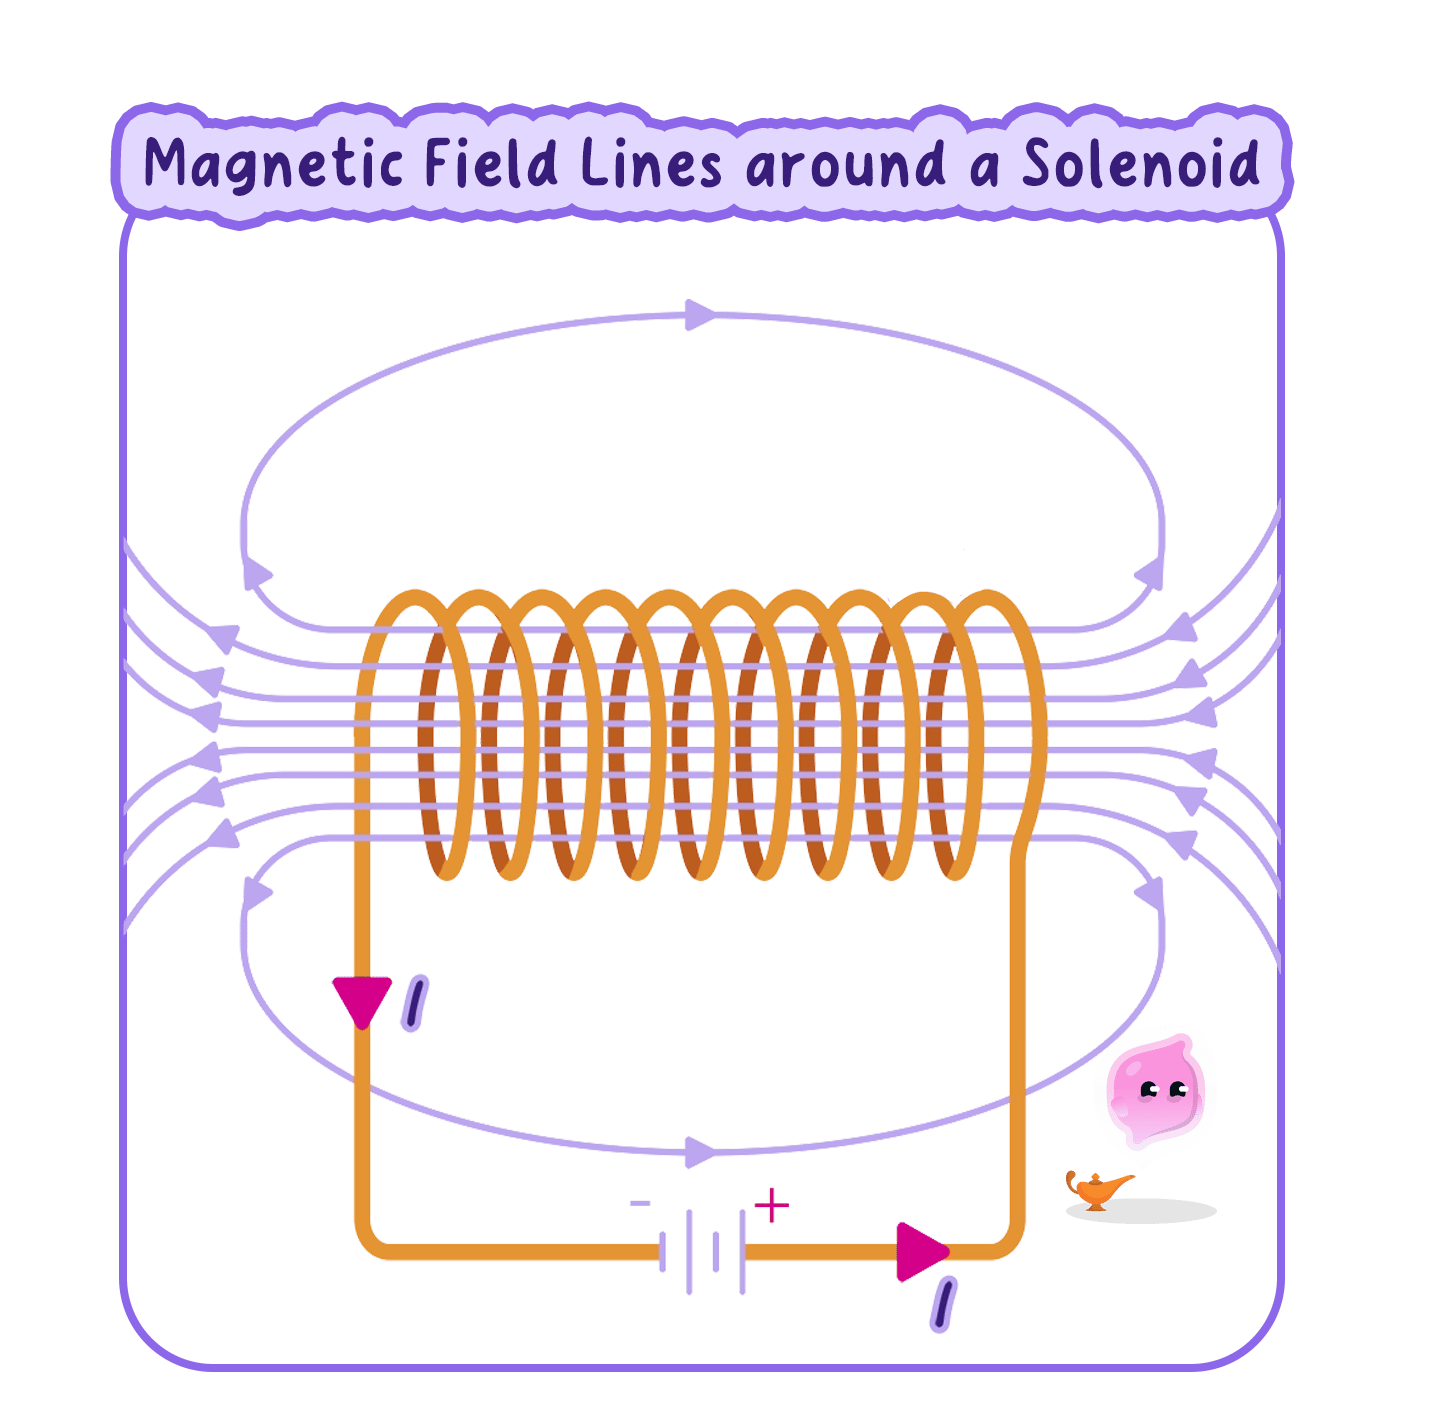
The field outside the solenoid
- Outside the coil the geometry is different. A point out there sits on the far side of some turns and near the near side of others, so the fields reaching it point in a range of different directions.
- Because those directions oppose one another, the contributions partly cancel instead of adding, so what is left over is small.
- The field outside is therefore much weaker than the field inside, and it is drawn with widely spaced lines that spread out around the coil.
- Weaker does not mean zero. The outside field is real, it is the part that reaches out to attract a nail, and it is what a plotting compass held beside the coil responds to.
- The same field lines that run down the inside of the coil come back round the outside, so the loops are continuous. Crowding them into the narrow inside and spreading them over the wide outside is exactly what makes one region strong and the other weak.
Key Idea
Inside a solenoid the fields from the individual turns act in the same direction and add together to give a strong, almost uniform field along the centre, while outside they act in opposing directions and cancel to give a weaker field.
Making an electromagnet stronger
- Increasing the current strengthens the field, because every turn then contributes a larger share.
- Increasing the number of turns strengthens the field, because there are more contributions to add together in the same length of coil.
- Adding an iron core down the middle strengthens the field greatly. The coil's field magnetises the iron, and the magnetised iron then produces a field of its own that adds to the coil's.
- The core must be iron rather than steel, so that it loses its magnetism the moment the current is switched off and the electromagnet truly releases its load.
- Winding the turns closer together also helps, because packing more turns into each centimetre of coil raises the field along the axis.
- These design choices show up in everyday devices: a scrapyard crane magnet uses a very large current and a heavy iron core, while a doorbell uses a small current and many fine turns.
Example
Comparing two electromagnet designs
- Coil A has 505050 turns wound on a plastic tube and carries a current of 2.0 A2.0\ \text{A}2.0 A. Coil B has 200200200 turns of the same wire wound over the same length on an iron rod and carries a current of 2.0 A2.0\ \text{A}2.0 A.
- The current is identical in the two coils, so any difference must come from the turns or from the core.
- Coil B has four times as many turns in the same length, so four times as many contributions add together along its axis.
- Coil B also has an iron core. The coil's field magnetises the iron, and the induced magnetism of the core adds a further field of its own.
- Coil B therefore produces a much stronger field and picks up far more paper clips, and the core effect alone accounts for most of that increase.
- Switching both coils off leaves neither of them magnetic, because iron keeps almost no magnetism once the magnetising field has gone.
Practical
Investigating the strength of an electromagnet
- Aim: to find how the strength of an electromagnet depends on the current in the coil and on the number of turns, and to compare the field inside and outside a solenoid.
- Apparatus: about 2 m2\ \text{m}2 m of insulated copper wire, a large iron nail or soft iron rod, a low-voltage direct current supply, a rheostat, an ammeter, a switch, a box of small steel paper clips, a plotting compass, a card sleeve, iron filings and connecting leads.
- Variables: the current or the number of turns is the independent variable, the number of paper clips lifted is the dependent variable, and the core, the wire, the clips and whichever of current and turns is not being changed are all kept the same.
- Method, building the electromagnet:
- Wind 202020 neat turns of insulated wire around the iron nail, keeping the turns touching and all wound the same way round, and leave long tails at both ends.
- Scrape the enamel off the two tails and connect them in series with the switch, ammeter, rheostat and supply.
- Set the rheostat to its maximum resistance so that the first current is small, and check that the ammeter reads before any clips are lifted.
- Method, changing the current:
- Close the switch, set the current to 0.5 A0.5\ \text{A}0.5 A, dip the end of the nail into the pile of paper clips and lift it out slowly and vertically.
- Count the clips hanging from the nail, then open the switch over the pile so that every clip drops off and can be counted as a check.
- Repeat for currents of 1.0 A1.0\ \text{A}1.0 A, 1.5 A1.5\ \text{A}1.5 A, 2.0 A2.0\ \text{A}2.0 A and 2.5 A2.5\ \text{A}2.5 A, taking three trials at each current and calculating a mean.
- Leave the switch open between readings so that the coil and the rheostat do not heat up, since a hot coil has a higher resistance and the current drifts downwards.
- Method, changing the turns:
- Fix the current at 1.5 A1.5\ \text{A}1.5 A using the rheostat, and check it after every change of coil because unwinding wire alters the resistance of the circuit.
- Repeat the clip count for coils of 202020, 404040, 606060, 808080 and 100100100 turns, winding each new coil over the same length of nail.
- Finally slide the coil off the nail and repeat one reading with no core at all, so the effect of the iron can be seen on its own.
- Method, showing the field pattern:
- Push the coil through a card sleeve, sprinkle iron filings on the card, close the switch and tap gently to reveal the pattern in and around the coil.
- Hold a plotting compass at each end of the coil in turn to identify which end is the north end, then reverse the supply leads and check that the ends have swapped.
- Expected pattern: the number of clips rises as the current rises and as the number of turns rises, the coil with the iron core lifts far more clips than the same coil without one, and the filings settle into dense straight lines through the middle of the coil with sparse looping lines outside.
- Processing: plot mean clips against current and mean clips against number of turns. Both graphs rise, and neither can be extended indefinitely because the iron core eventually reaches saturation and stops getting any more magnetic.
- Watch out: turns wound in opposite directions, which cancel rather than add; clips of mixed sizes; lifting the nail too quickly so clips shake off; leaving the current on so the coil overheats; and clips clinging to the nail from a previous reading because the iron was not fully demagnetised.
- Safety: the coil becomes hot, so keep currents modest and switch on only in short bursts, never connect the coil directly across the supply without the rheostat, take care with the sharp nail point, and pick up dropped clips at once.
Exam technique
Explaining the solenoid field
- This explanation is marked as a comparison, so a full answer has to deal with the inside and the outside, not just say that the field is strong.
- Start every answer from the individual turns. The examiner is looking for the idea that each turn produces its own field before anything is said about adding or cancelling.
- The four phrases that carry the marks are fields from individual turns add together, strong almost uniform field along the centre, fields cancel outside and weaker field outside.
- Include the reason for each half using the word because, since the marks are for the cause rather than the description.
- For a question about improving an electromagnet, give a change and its effect together, such as increasing the number of turns so that more fields add along the centre.
Common Mistake
- Do not write that there is no field outside the solenoid. The outside field is weaker, not zero.
- Do not say the field inside is perfectly uniform. It is almost uniform, and it fans out near the open ends.
- Do not describe field lines as objects that push each other. They are a way of drawing a field, and it is the fields themselves that add and cancel.
- Do not suggest a steel core for an electromagnet that has to release its load, because steel stays magnetised after the current is switched off.
Self review
- Explain why the fields from the individual turns add together inside a solenoid.
- Describe the field lines drawn inside a solenoid and say what each feature represents.
- Explain why the field outside a solenoid is weaker than the field inside it.
- Give three changes that would make an electromagnet stronger, with a reason for each.
- State what happens to the north end of a solenoid when the current is reversed.
- Describe how you would show experimentally that more turns give a stronger electromagnet.