Definition
Fleming's left-hand rule
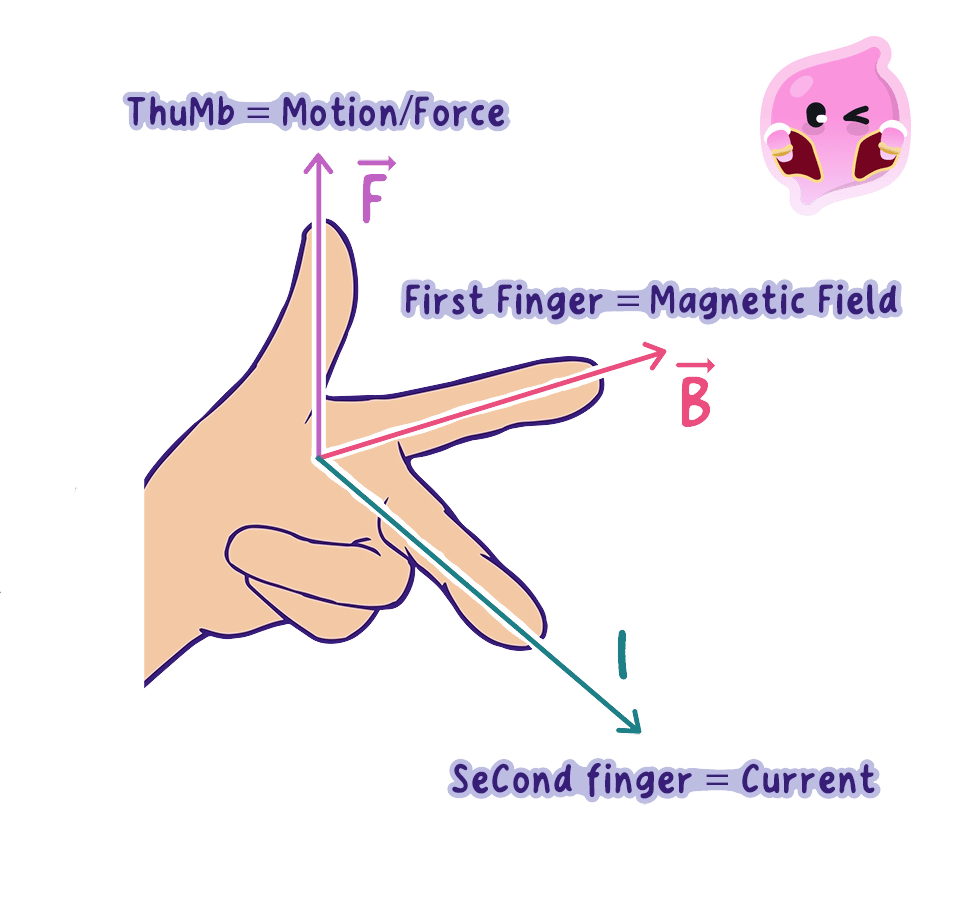
Fleming's left-hand rule states that when the first finger, second finger and thumb of the left hand are held at right angles, the first finger gives the magnetic field direction, the second finger the conventional current direction and the thumb the direction of the force.
Definition
Mutually perpendicular
Three directions are mutually perpendicular when each one is at 90 degrees to both of the other two.
- The rule turns your left hand into a model of three directions at right angles to each other, so that knowing any two of them gives you the third.
- Hold out the thumb, first finger and second finger of the left hand so that all three are mutually perpendicular, each one at 90∘90^\circ90∘ to the other two, like the corner of a box.
- Each digit then stands for one quantity:
- First finger gives the direction of the magnetic field, taken from north to south
- Second finger gives the direction of the conventional current, from positive to negative round the circuit
- ThuMb gives the direction of the force on the conductor, which is also the direction it moves in
- The capital letters give the memory aid: First finger for Field, seCond finger for Current, thuMb for Motion.
- The rule works because the force in the motor effect always acts at right angles to both the field and the current, so the three directions really do form the corner of a box.
- It applies only when the field and the current are themselves at right angles to each other. A conductor lying along the field lines has no force on it, and the rule cannot be set up.
- It is the left hand for the motor effect. The right hand belongs to the grip rule for the field around a current-carrying wire, and mixing the two hands gives an answer that is exactly backwards.
Using the rule
- Work through the same four steps every time, in this order:
- Read the field direction off the diagram, remembering that it runs from the north pole to the south pole.
- Read the current direction off the diagram, checking that it is conventional current and not electron flow.
- Point the first finger along the field, then rotate the whole hand about that finger until the second finger lies along the current.
- Read the force direction off the thumb.
- The rule can be run in any order. If the question gives the force and the field, set the thumb and first finger to match and the second finger then reveals the current direction.
- Reversing the current alone reverses the force, reversing the field alone reverses the force, and reversing both leaves the force pointing the way it did to begin with.
- Conventional current runs from the positive terminal round the external circuit to the negative terminal. Electrons in a metal drift the opposite way, so using electron flow gives a force in exactly the wrong direction.
- Do the hand movement physically rather than in your head. Turning your wrist and elbow to line the fingers up with the page is what makes the answer reliable.
- Keep the first finger fixed on the field while you rotate, because moving it as well is the commonest way of arriving at a wrong answer.
Dots and crosses on diagrams
- A flat diagram has to show directions that point straight into or straight out of the paper, and two symbols are used for this.
- A dot means the direction is out of the page, towards you. Picture the sharp point of an arrow flying straight at your eye.
- A cross means the direction is into the page, away from you. Picture the crossed flights at the tail of an arrow disappearing into the distance.
- Either symbol can stand for the field or for the current, so read the label on the diagram rather than assuming which one it is.
- A grid of crosses drawn over a whole region usually shows a uniform magnetic field directed into the page.
- To use the rule with one of these, turn your hand so that the matching finger points at the page or straight back towards your own face, and let your wrist take whatever position it needs.
- Never force your palm to stay flat against the desk. The hand has to be free to twist, and the answer is often uncomfortable to hold.
Example
Finding the direction of the force
- A straight conductor carries conventional current into the page, shown by a cross, and it sits in a magnetic field that runs from left to right across the page.
- Choose the left hand, because this is the motor effect.
- Point the first finger to the right, matching the field direction shown on the diagram.
- Rotate the hand about that finger until the second finger points away from you, into the page, matching the cross.
- The thumb is now pointing down the page, so the force on the conductor acts downwards.
- Changing the cross to a dot, so the current now comes out of the page, reverses the current alone and the force becomes upwards.
Exam technique
Applying the rule in the exam
- Label the diagram before you touch your hand. Write F beside the field arrow and I beside the current arrow so that the two given directions cannot be swapped by mistake.
- Check the poles on the magnet and draw the field arrow yourself if the paper has not drawn one, always from north to south.
- Name the rule in your written answer, then give the direction, for example that Fleming's left-hand rule shows the force acts into the page.
- Answer with a direction the examiner can mark, such as upwards, to the left or out of the page, rather than a vague phrase like away from the magnet.
- If the question shows a circuit rather than an arrow, trace the path from the positive terminal of the supply to find which way the conventional current runs through the conductor.
Common Mistake
- Do not use your right hand. The motor effect needs the left hand, and the right hand is for the grip rule.
- Do not put electron flow on the second finger. The rule uses conventional current, which runs the opposite way to the electrons in a metal.
- Do not swap the first finger and the thumb. The first finger is the field and the thumb is the force.
- Do not read a dot as into the page. A dot is the point of the arrow coming out at you.
- Do not apply the rule when the current runs along the field lines, because there is no force to find in that case.
Self review
- State which hand is used for Fleming's left-hand rule and which quantity each digit represents.
- Explain what mutually perpendicular means and why the rule requires it.
- State which current direction must be used and how it compares with the direction electrons move in a metal.
- Give the meaning of a dot and of a cross on a direction diagram.
- A field points to the left and the conventional current points out of the page. Determine the direction of the force.
- State what happens to the force when both the current and the magnetic field are reversed.